Homework 3: Cache Assignment in gem5
Due: Wednesday, 3/4 at 11pm
Overview
In this assignment, you will implement a writeback cache from scratch and use it to simulate real programs in gem5. This will allow you to evaluate your cache under different workloads and with different configurations. There will be a few iterations of your implementation, where each step is designed to build on the previous step. You will only submit the code associated with the final iteration to Gradescope.
Stencil code
The devenv images use the course gem5 repo. Here is the github classroom link to get a copy of your own repo. If you’re not using the github classroom link, you’ll need to git pull to get the latest config scripts. You will build gem5 by running the aliased command build-gem5, which builds gem5 to /gem5_build/gem5.debug (this is different than the gearup recording/slides – we use this configuration to allow for a cached pre-build that lives in the Docker image). The files that you will need in this assignment are src/mem/cache/micro-cache.{hh,cc}.
Running the simulation
We provide three configuration files in configs/assignments/hw3 for running your code. For example, ucache_binary.py situates your cache as an L2 cache connected to a CPU via L1 d- and i-caches on the CPU side and to DRAM on the memory side. Run
/gem5_build/gem5.debug configs/assignments/hw3/ucache_binary.py -h
To see the options. For the binary, you can find some compiled binaries in tests/test-progs/cache-tests, and you can also try out some of the pre-compiled RISCV binaries that come with gem5, such as tests/test-progs/hello/bin/riscv/linux/hello. The --control flag will run the built-in gem5 cache instead of your cache, which can be helpful for seeing what the gem5 output usually is for a given binary.
The other two configurations, which will probably be more useful for debugging, are ucache_traffgen.py and ucache_manual.py and attach the CPU side of your cache to a “traffic generator” that simulates cache requests. You can similarly use the -h flag to see the usage. We’ll talk about traffgen below. Using `ucache_manual.py* will require you to modify the file yourself, specifically this line:
# edit this to simulate next request!
# tuples are: (start addr, size (in bytes), r/w (True if read, False if write))
# address range (512 MB = 29 bits) = 0x00000000 - 0x1fffffff
reqs = [(0x0, 64, True), (32, 32, True)]
Each tuple in the list simulates a request to the cache. Feel free to modify/add/remove the tuples to send more requests. Because there is no OS/virtual memory/memory protection, requests to any address in the range 0-512MB are valid (including 0).
Submission and grading
There are two Gradescope assignments you are submitting to. You’ll upload your implementation and written components to the main one (“HW3 (Caches)”) as a single submission. For the code, upload the micro-cache.{hh,cc} files. For the written component, upload a single PDF. You will also be submitting json files to the “HW3 (Cache Profiling)” Gradescope assignment, but we will not directly grade those jsons.
The autograder will run some tests on your code, which will range from basic (sending just a handful of requests) to more advanced (comparing two programs with different array access patterns) and check that the corresponding gem5 statistics (miss rate, latency) look reasonable. We will also check your code manually to make sure that it conforms to the directions put forth in this handout. Finally, we will grade your responses to the written questions to assess your conceptual understanding of caching.
Tips
The dependencies are: Part 1 depends on part 0, Part 3 depends on Parts 2 and 3. Part 4 will benefit from you at least attempting Part 3 before starting. If you need a break when debugging Part 1, feel free to work on Part 2 (especially since Part 2 will involve some waiting to get results). The earlier you start, the more data points you can collect from Part 2.
gem5 is a complicated tool. Using it or extending it straight out of the box can be tricky, so it will be useful to examine the gem5 cheat sheet and/or revisit the gear-up session recording and slides (all on the resources page) in order to familiarize yourself with the tool. Feel free to come by office hours for further clarifications, but note we may refer you to the available resources if we believe the answer can be found there!
Part 0: Protocol Description
Before starting to code, read through this assignment handout, including the interface description of the MicroCache below and the stencil code, and make sure you understand the general role of the cache you’re being asked to implement. To guide your work, sketch a finite state machine controller for the cache protocol that deals with CPU requests (i.e., you don’t have to describe the coherence protocols). The state machine is driven by the handleRequest and handleResponse callbacks (i.e. your transitions should happen based on the information from these functions). You’ll be turning a modified version in for a response in Part 4. If you ask us debugging questions, we’ll ask for your state machine first. Your state machine should be complete enough that the pseudocode for the assignment should follow. It doesn’t need to be wholly exhaustive, but you should enter the state machine at a starting state, and consider the following questions:
- What are the inputs and outputs to the FSM, as enabled by the MicroCache/gem5 API described below? What data does it need to track/modify internally?
- What changes when a CPU request is a read vs. a write?
- How do you determine when a request is a hit? What happens during a hit? What happens during a miss?
- What should be sent to memory and when? What should happen on the response?
- When should the cache block? What should it do when it blocks?
Why an FSM?
A cache is a complicated mechanism that may take several steps for a specific action. A finite state machine allows you to express the order in which these steps happen. For example, caches might wait for a response from memory before being able to do some next step, and this sort of behavior is straightforward to express in a "wait state" of an FSM. For a more detailed overview, check out section 5.9 of P&H! Note: in the past, students have just tried to use Figure 5.39 directly. While this is a good start, it will eventually lead you to get stuck, because it doesn't quite conform to the interface that the MicroCache uses. Specifically, pay attention to the questions above.
Part 1: One-Block Cache
In the first part of this assignment, you will implement a cache that will only ever consist of a single 64-byte block, based on this study. The aim of this part of the assignment is to familiarize you with the gem5 environment, and evaluate the impact of having a single block cache in terms of performance with different benchmarks.
In the micro-cache.cc file, you will see that there are two functions for you to complete: handleRequest and handleResponse. For the cache to work, these functions need to implement well-defined behavior, which should conform to your state machine as described in Part 0.
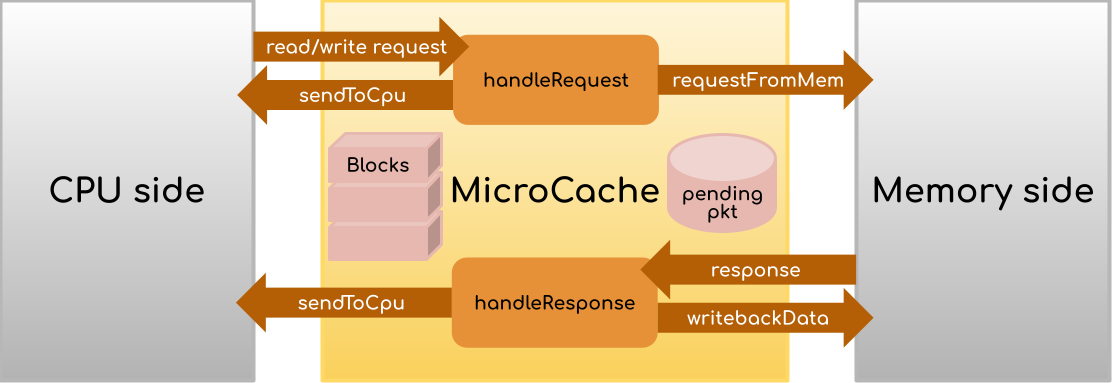
The ucache_binary.py config file situates the MicroCache as an L2 cache connected directly to DRAM on the memory side. The L1 D- and I-caches use the existing gem5 implementation and both make requests to the MicroCache. However, theoretically, the MicroCache could be plugged in to any level of the hierarchy and still work, because read/write requests will only ever come from the CPU side of the hierarchy. ucache_traffgen.py and ucache_manual.py work with this abstraction by connecting the CPU side of the cache to a generator that simulates read/write requests.
handleRequest receives a PacketPtr (i.e., Packet *) from the CPU, and will perform either the hit or the miss routine. The hit routine occurs if the data being searched for resides is currently in the cache. Otherwise, perform the miss routine, which keeps a pointer to the Packet around (using the pending field) to refer to when a response comes back from memory. In either case, handleRequest should increment the stats.hits or stats.misses counter in order for your assignment to be graded!
On the other hand handleResponse should perform the post-memory access routine. That is, the pkt in the function arguments is the response of a memory request (that you will create!), and not the CPU request. Remember, your response may need to replace some existing data in the cache, so be sure to handle this case appropriately!
Details
You may assume that CPU-side requests will not cross block boundaries (i.e. you will not need to fetch multiple blocks to service a single request). The block size (and therefore the size of requests to memory) is 64 bytes, so make sure that any requests to the memory side are aligned at 64-byte boundaries. For now, ignore the size and assoc fields of the MicroCache class.
Your implementation must heed the following:
- You should ensure that only one memory request can occur at a time by setting the “blocked” flag. This includes writeback requests – we do not want to process requests while data is being written back. The
writebackDatafunction (written for you) sends a request that requires a response from memory so that you can detect when the writeback completes. - You should ensure that all cache accesses apply a latency by using
schedule(see examples in the scaffolding). The buses and RAM will incur a latency of their own, but we need to make sure that any L2 access is modeled with its own latency! - Any write request (even one that technically has no effect by writing the same value that is already stored in the cache) should render the block dirty (that is, you don’t need to do any comparisons of data before and after the write).
We’ve implemented a few helper functions for you in micro-cache.hh. For communication with the CPU, if the handleRequest function returns false, the CPU needs to eventually be told to retry the request. The unblock function (which is called from sendToCPU or can be called/scheduled by itself) does this for you. For communication with memory, the requestFromMem and writebackData functions set up the requisite packets, which then need to be deleted (the scaffolding in handleResponse does this for you).
We have also provided a Block struct for you. For the single-block cache, you only need to allocate one block and keep its fields updated throughout execution.
Overall, gem5 uses a lot of objects that use a lot of functions – many of which are not relevant to this assignment. Full listings of packet functions can be found in the src/mem/packet.hh header, or in the formal documentation. For your convenience, here are some functions that you may find useful:
- Addr Packet::getAddr() (e.g.,
pkt->getAddr()): returns the address of the current packet. Note, Addr is an expansion of uint64_t - unsigned Packet::getSize() (e.g.,
pkt->getSize()): returns the size of the current packet. - bool Packet::isWrite() (e.g.,
pkt->isWrite()): returns true when the current packet has data to write to the relevant block. (also,pkt->hasData()should return true here) - bool Packet::isRead() (e.g.,
pkt->isRead()): returns true when the packet should read data from the relevant block - T* Packet::getConstPtr
() (e.g., `pkt->getConstPtr<uint8_t *>()`): returns a pointer of type T to the data stored in the packet - void Packet::writeData(uint8_t *p) (e.g.,
pkt->writeData(p)): sets the data stored at pointer p to the packet. - void Packet::setData(const uint8_t *p) (e.g.,
pkt->setData(p)): sets the data stored in the packet to the pointer p. - bool Packet::needsResponse() (e.g.,
pkt->needsResponse()): returns true when the current packet should be returned to the CPU with the relevant fields updated (data should be set to the packet if it is a read, etc)
Testing
As stated above, we recommend primarily using ucache_manual.py to test and debug your code. For example, the two memory requests that are initially in the file (a 64-byte read of address 0 and a 32-byte read of address 32) should result in 1 miss (“l2cache.misses”) and 1 hit (“l2cache.hits”) as recorded by m5out/stats.txt and test that you are computing block boundaries correctly.
If your run ends in an error or has an unexpected miss rate, you will have to debug your implementation. The gem5 gearup has resources on using gdb to debug gem5. You can also put DPRINTFs in the code with the MicroCache flag (e.g. DPRINTF(MicroCache, "This is my cool debug message")) and enable the MicroCache debug flag on a run. We also suggest enabling the TrafficGen debug flag when using the manual and linear generators (note that --debug-flags goes before the config script, and keep in mind that TrafficGen addresses are displayed in hex):
/gem5_build/gem5.debug --debug-flags=MicroCache,TrafficGen configs/assignments/hw3/ucache_manual.py
Once you have confidence that your cache is working, try running it against the sample test binaries using ucache_binary.py! Keep in mind that this config file connects your cache to both the L1 i- and d-caches, so the requests you’ll get will be hard to debug directly. Use this as a diagnostic: if the simulation fails to run (craches or hangs), try to narrow down the issue using traces/gdb, and then go back to the manual config to more easily spin up a similar scenario.
Note from the staff: we’ve tried our best to provide statically compiled binaries that work with all environments (local, docker, autograder). If you find that one or more of the binaries are crashing when you use the --control flag, please make an Ed post and we’ll look into it. If a binary runs with the --control flag but not without, that means there’s an issue with your MicroCache implementation.
Part 2: Profiling
Associativity
One problem with the direct-mapped cache design we worked through in class (where each block address maps to exactly one block in the cache) is that some code can get unlucky with conflict misses, and will always run poorly on a specific piece of hardware. For example, consider a 1KB cache that uses a block size of 64B (16 blocks) and consider an instruction at memory address 0x00000184 that looks like lw s0 0x10000580. Both of of these addresses will map to the same block (check your understanding: index 6) in the cache. Since the L2 cache services both instructions and data, the instruction will get loaded in first, then the load will evict the instruction, which means that the following instruction (which will be in the same block as the current instruction) is guaranteed to be a miss. All because we got unlucky with a modulo!
One solution to avoid conflict misses is to allow a memory address to map to any location in the cache and use the block address for the tag field. This is called a fully associative cache. On any access, the cache controller compares all of the tag fields of all locations against the requested address to find a hit. While this allows for very flexible placement, you can imagine that the comparison hardware gets complicated when we have a large cache.
Most modern caches use an in-between solution called a set-associative cache. The cache is organized into “sets” of multiple blocks, where memory addresses map to sets within a cache. Because a set holds multiple blocks, addresses that would have mapped to the same block are allowed to co-exist within the cache without evicting each other (until the set is full). To detect a hit, the comparison only needs to check the tags of the blocks within a specific set. Read Chapter 5.4 of P&H for a nice illustrated example.
Both fully-associative and set-associative caches need to use a more complex eviction criterion when the cache/set (respectively) becomes full. A common scheme is called “LRU” (least-recently used), which evicts the block that was accessed the least recently to make room for the next block. This is justified by the principle of temporal locality.
Mystery cache
We’ll move on to enlarging our cache (including associativity) in a bit, but first, let’s reason about the effects of cache size and associativity on performance. In class, we’ve seen (and will continue to see) a few examples of real-world specs, such as sizes for modern L1, L2, and L3 caches. Sometimes, the manufacturers of the computers provide these specs, but other times, they are hidden from the consumer. How do people find out these specs? By running some sort of workloads on the computer and observing their effects on performance. For this part of the assignment, you will do the same.
We have given you a config file called ucache_traffgen.py, which invokes a TrafficGenerator (src/cpu/testers/traffic_gen). traffgen.py has two required arguments: mode (linear, random, or strided) and read percentage (0-100 inclusive). We can also optionally pass in the (exclusive) max address (e.g. 128B, 1kB, 32MB, etc, not to exceed 512MB), the number of requests we want to make, and the request size in bytes (not to exceed 64, or the block size). The random generator makes random requests for addresses between 0 and the max address, and the linear generator makes linear requests (incrementing the address by traffic_request_size bytes for each request), wrapping back around to 0 if it reaches the max address. The strided generator uses its own option, traffic_stride, and always makes 64-byte requests, traffic_stride bytes apart (so if traffic_stride = 128, the first request will be at address 0, the second at 128, then 256, and so on). For example, try out this command:
/gem5_build/gem5.debug configs/assignments/hw3/ucache_traffgen.py linear 100 --traffic_request_size=16 --traffic_num_reqs=100
If you take a look the output stats, you should see exactly 25 misses. Check your understanding: why is that? Remember that you can use --debug-flags=TrafficGen to see the addresses being sent (in hex).
If we hook the traffic generator up to a mystery cache and play around with the mode, max address, number of requests, and request size, we can derive the size and associativity (number of blocks per set) of the mystery cache. The gradescope assignment “HW3 Cache Profiling” allows you to do that. You will submit a .json file providing these four fields, using this exact format (all fields optional; default values are as below):
{
    "mode": "random",
    "max_addr": "512MB",
    "num_reqs": 1,
    "req_size": 64,
    "stride": 64
}
The autograder output will report the number of cache hits and misses.
A few notes:
- The mystery caches all have a block size of 64B, can be anywhere from 1kB-512kB (inclusive, and always a power of two kBs) and can range from direct-mapped to fully-associative to anywhere in between.
- The json file will be rejected if the values are malformed (values not multiples of 2, request size exceeds 64, stride is not a multiple of 64, etc). Make sure you can run
ucache_traffgen.pylocally with the same arguments to troubleshoot. - There are multiple different cache configurations, assigned using a very complicated formula on your student id, so you can’t just ask your friend what they measured.
- Unfortunately, due to how the autograder stores user data, only one submission from a user can be running at a time. There is no limit to how many times you can submit, but you shouldn’t submit multiple times before the autograder finishes running.
- Gradescope allows you to view your previous submissions, so you can access your json/results from earlier runs.
- For the strided generator, req_size is ignored (requests are always 64 bytes). Make sure stride is a multiple of 64, so that requests do not cross block boundaries. The linear and random traffic generator ignore the stride option.
A: In your pdf file, provide a guess for the cache size and associativity of your mystery cache and back up your reasoning using the results you observed.
B: In the real world, the computer doesn’t simply spit out a miss rate and hit rate after you run a workload. Run the ucache_binary.py config with the built-in cache (using the --control flag) and a couple different size and associativity parameters. Take a look at what is reported by m5out/stats.txt for prog1, prog2, and prog3. Based on what each program is doing, are you able to observe the effects you expect? What stats are most useful? (You don’t have to write any answers down here/report any stats. It’s meant to kick-start your reasoning for the subsequent paragraph.)
In your PDF file, explain how you think cache size profiling is actually done. How do you account for complicating factors such as multiple levels in the memory hierarchy, multiple processes, etc? We’re not looking for you to get this 100% right, but we want you to demonstrate understanding of computer performance metrics and of the various factors that affect how a workload interacts with the memory hierarchy. If you read sources on the way to answering this, please cite them (actual sources, not just ChatGPT).
Part 3: Caches with sets
Your cache implementation may well be fully functional after Part 1, but realistically it’s not super usable. Let’s add some capacity to this cache so that we can store more than 64 bytes at a time.
Your implementation should use the size field (an integer that specifies the size of the cache in bytes) in the constructor of the MicroCache, and allocate the appropriate amount of space for each of the blocks. Ignore the assoc field and start with a fully-associative cache, that is, one where an address can map to any block (i.e. the cache is made up of one large set). Test it out and then use the assoc parameter to customize the associativity (number of blocks per set) of the cache. You will have to do some math here to figure out how to track the number of sets. You can assume that the size/assoc configuration will be reasonable (assoc a power of two, allows for sets that are an integer multiple of block size). Even though you’re simulating a cache controller in software and are probably using uints for addresses, make sure your code demonstrates your understanding of which bits the tag field of each block will actually store.
The handleRequest function will now have to search across the blocks in a set in order to determine whether or not to follow the hit or miss procedure. Make sure you’re only searching in the required set. How can you adapt the math we learned in class to use the request address to index into the appropriate set? (You can also refer to section 5.4 of P&H to review this conceptually).
The handleResponse function now needs to choose which block to fill the new data. In this case, we would like to:
- Fill an empty block if one exists; or
- Choose a block in the cache to evict (using LRU) in order to make space for this new data to fill.
To track which block has been used the least recently, you should modify what is stored with each cache block in the micro-cache.hh file, and update this timestamp with the curTick() each time the block is accessed (unlike the tag field, we don’t mind if your implementation tracks more bits than strictly necessary).
Be sure to use the config scripts and what you’ve learned in part 2 to test out your cache!
Least recently used is far from the only possible replacement policy. In fact, there are several other replacement policies, including: least frequently used, time-aware least-recently used, most-recently used, etc (to read more, see here).
Part 4: Reflection
Include the answers to the following questions in your PDF
A: What would it take to add a 64-byte write buffer to your MicroCache? Modify your FSM from part 0 . Just like we talked about in class:
- the cache shouldn’t block requests to unrelated addresses if a write-back to memory is pending in the buffer
- a read request for an address that is not in the cache but is in the write buffer should be fast (i.e. reads should check both the cache blocks and the write buffer for a hit. A write to an address present in the write buffer and not the cache, on the other hand, should miss, but doesn’t have to block – as long as you’re careful about the implementation1)
- if the buffer is full and request that results in a write-back occurs, the cache should block until it can put the new write in the buffer
B: Take a look at figure 5.18 of P&H, the data from each block in a set is being routed to a multiplexer whose selector uses the result of the tag comparison (you probably implemented as a loop in simulation). Because at most one block will match the tag we’re looking for, the circuit is wasting energy transferring data from all of the blocks in the set. The more associativity we have, the more energy this is going to use. One approach for dealing with this is way prediction (original paper), which predicts which block in the set will be a hit (the paper uses a most-recently-used scheme), and starts transferring only the data and tag from that block. The transferred tag is then compared to the desired tag. If the tags don’t match, then the circuit transfers the data/tags from the other blocks in the set to search for a miss (see figure 2). This misprediction introduces some delay, but can save energy – in the worst case, all data/tag lines are accessed (same as the traditional case), but if the best case is common, only one line is accessed much of the time.
B-1: What additional field(s) would you need to add way prediction to our cache in gem5?
B-2: The original paper models energy usage using some approximations based on prediction hit rate (see formula 7), uses a cache simulator to measure the prediction hit rate, and reports estimates of energy savings based on these two things. The paper was written in the 1900s. These days, gem5 supports power modeling, with the caveat that “the definition of a power model is quite vague in the sense that it is as flexible as users want it to be.” This video (13 minutes) shows how folks at arm use gem5 for power modeling. Given that way-prediction involves optimizing the use of specific wires, some thermal modeling would need to be done to compute the energy savings from way-prediction in gem5. Are you convinced by the way energy modeling done in the original paper? If someone created an updated version of that paper that reported numbers from gem5 power modeling, what evidence would you need in order to believe that the gem5 power modeling produces more accurate results than the original paper?
B-3: Same with time – formula 8 is a decent approximation, but what assumption is it making/what is it missing (hint: the formula is relative to cycle time. Are we guaranteed that cycle time is constant between the cache configurations the paper presents?). If you wanted to use the latency-based modeling in gem5 to compare the performance of a cache with way-prediction to the performance of a cache without, how would you justify the latency/ies you chose?
Handin
Your submission should include the following files, all made to the same Gradescope submission:
- Your implementation for the
micro-cache.{hh,cc}from Part 3 - Your pdf with your written responses from Parts 2 and 4
Quiz prep
These are the sorts of questions you might expect to appear on the quiz that follows this homework.
- Given a cache size, block size, and associativity (number of blocks in a set), annotate which bits of a 32-bit address are used for indexing into the cache and which bits are used for the tag (or vice versa, as in P&H 5.5)
- Given a cache configuration and a sequence of memory requests, draw out what the cache will look like at the end of the sequence (similar to P&H 5.2)
- Describe the general pros/cons of different cache configuration decisions (block size, associativity, write through vs. write back) (we won’t have you do the CPI computations in P&H 5.12, but working through the question can have you think more about the tradeoffs of these configurations at different levels of the hierarchy)
- Given a page table and TLB, draw out what happens at the end of a sequence of virtual address accesses (similar to P&H 5.16)
- Given a cache configuration, give an adversarial sequence of requests (a sequence that maximizes the miss rate) (P&H 5.20)
Note: the quiz isn’t a math quiz. We’ll do our best to make the numbers easy.
Changelog
- 3/2 6:30pm: fix
setData/writeDatadescription
This will be updated whenever any clarifications have been added to this assignment. See also the FAQ on Ed!
-
This is meant to model how a write buffer works. A write to memory takes multiple cycles, so we don’t want to modify the data while it’s being copied over. Reads from the write buffer are fine, because they don’t interfere with the buffer-to-memory bus. ↩